VPS Server Protection Tools
6-03-2024, 11:04
Installing Python bots and scripts on the server

Today we will tell you how to install a bot on a dedic with an Ubuntu ( Linux) system
Some abbreviations:
VPS/VDS (Dedic) is a virtual dedicated server running 24/7, which the hosting provider rents to users.
Linux (Linux) is a system different from Windows, which is based on working with the console. But there are also graphics systems.
Ubuntu (Ubuntu) is a Linux operating system based on Debian GNU/Linux.
1. Which service should I choose?
Minimum tariff:
Disk: 30GB
Processor: AMD Ryzen 9 7950X3D | 1 Core | 4.2-5.7GHz
RAM: 2 GB
Features:
Backups — you can make up to 7 copies, set up automatic copying.
OS selection: Ubuntu, Debian, CentOS, Alma, Rocky, Astra, FreeBSD (Windows Server, Windows — not at the minimum rate)
Minimum tariff:
Disk: 15 GB|SSD
Processor:
Tech support did not respond, let's fire the dude | 1 Core | 2.8 GHz
RAM: 1 GB (not enough, but it will do for a simple script or telegram bot)
Features:
Backups - you can make a copy of your files
GPT Support - it works crookedly, but if you formulate the question correctly, it will answer the topic.
Its own Configuration - you can choose your own server characteristics without unnecessary Disk space, for example.
OS selection: Ubuntu, Debian, CentOS, BitrixVM + CentOS, Astra Linux CE, AlmaLinux, Arch Linux, BrainyCP + Ubuntu
I used Aeza and TimeWeb, but at the moment I use TimeWeb and everything is fine. The rest of the services were used, but they were not successful or incompetent support
2. Purchase of a server
Let's analyze the purchase of a server on the hosting that I use myself, namely on TimeWeb. Click on the link to select or configure the server and go to the next link, where we select the Image.
1. The image
Here we select the Image, namely Ubuntu of the latest version. But there are also other tabs. Marketplace, where you can choose ready-made servers, VPN and other things:

2. Region
Below we can choose where our server will be located. The server response delay will appear here. Of course, we take the smallest:

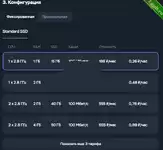
3. Configuration
In this tab, we select our characteristics. In the Custom tab, you can carefully configure the server exactly for your wishes:

4. Also other settings
But it is at your discretion. Whether to put backups and the rest. But if you don't want to overpay, take it away
5. Conclusion on setting up
Further to the top right, we see what we have chosen, and then click on the Order button:
Well, then we choose the payment method and pay for the server.
3. Setting up the server
We get to the page
and now this is our panel:
1. We receive the login information
To start, in the Dashboard on the bottom right, take the IP address of the server (IPv4)
You will also receive a password from the root user, either on the main page or in the mail. But if you have lost it somewhere, then go to the Access tab and click the button to change the password:
And you will see the root password item just below on the main page
of the server:
We are storing the data and now we will proceed to connecting to the computer and the phone
4. Setting up the server
Installing the program
I think anyone can install it, there's nothing complicated about the Install buttons.
1. Setting up
We plug it into our port 22 and set the settings the same way as mine and specify the password that is hidden under the black circles
And click Log In from below
If you have successfully connected, you will see buttons on the left. We are interested in New Terminal Console ( for working with commands and startup) and New Windows SFTP ( for working with files ):
Go to SFTP ( file manager with our server ) and transfer the script file or folder
A file or folder can be moved to the right block of Remote files. Note that you must be located in the /root directory
2. Launch
Open the Terminal and write the command
apt update -y && apt upgrade -y && apt install python3 -y && apt install python3-pip -y && apt install screen -y && apt install python3-venv -yAfter completing the command, we check whether your file is on the disk with the ls command
If the file has been moved and everything is OK, then move on
We prescribe the command
screen
This text greets us and we press Enter
If this is a folder such as script, then go to the directory
cd scripIf this is a script, then we set the necessary settings, if you don't know, we won't check it yet
We write a command to run the script example script.py
python 3 script.py
As we observe the error.
If the error is: No module named 'telethon'. Then you need to install telethon with the pip command
pip install telethonAfter that, also run the file until it starts correctly, or until the same error occurs and install these dependencies
And close the screen by pressing Ctrl + A + D
To return to the screen, we prescribe
screen -r
WARNING: Running pip as the 'root'
In this case, you need to use v env, which we installed with the first command. We install two commands:
python3 -m venv venv
source venv/bin/activate
After that, we repeat the installation of dependencies and run the script
6-03-2024, 11:04
15-01-2023, 13:04
4-03-2024, 04:20


4 comments
Information
Users of Visitor are not allowed to comment this publication.